
FF1600 Brake Bias: How to Find the Setting That Actually Makes You Faster
A practical guide to brake bias in the iRacing Ray FF1600. Built for rookies and intermediate drivers who want to stop guessing and start feeling the car.
Why your fast laps feel like luck

You brake at the same marker as the driver who lapped you last race. Same gear. Same line. Same downshift. He arcs through the corner like the car is on rails. You arrive sideways, or three feet wide, or with the fronts chattering halfway to the apex.
That is not always a talent gap. A lot of the time, it is two clicks on the brake bias slider.
The FF1600 has no wings, narrow tires, and low power. The brake pedal does more than slow the car. It sets the chassis. It decides whether the car turns or pushes. It decides whether the rear stays planted or steps out. A rookie who learns brake bias before chasing tenths in the corners will skip past dozens of frustrated drivers who never figure out why their car refuses to cooperate.
This guide fixes that. Not with theory. With feel, drills, and a clear method to find your own setting.
What brake bias actually controls
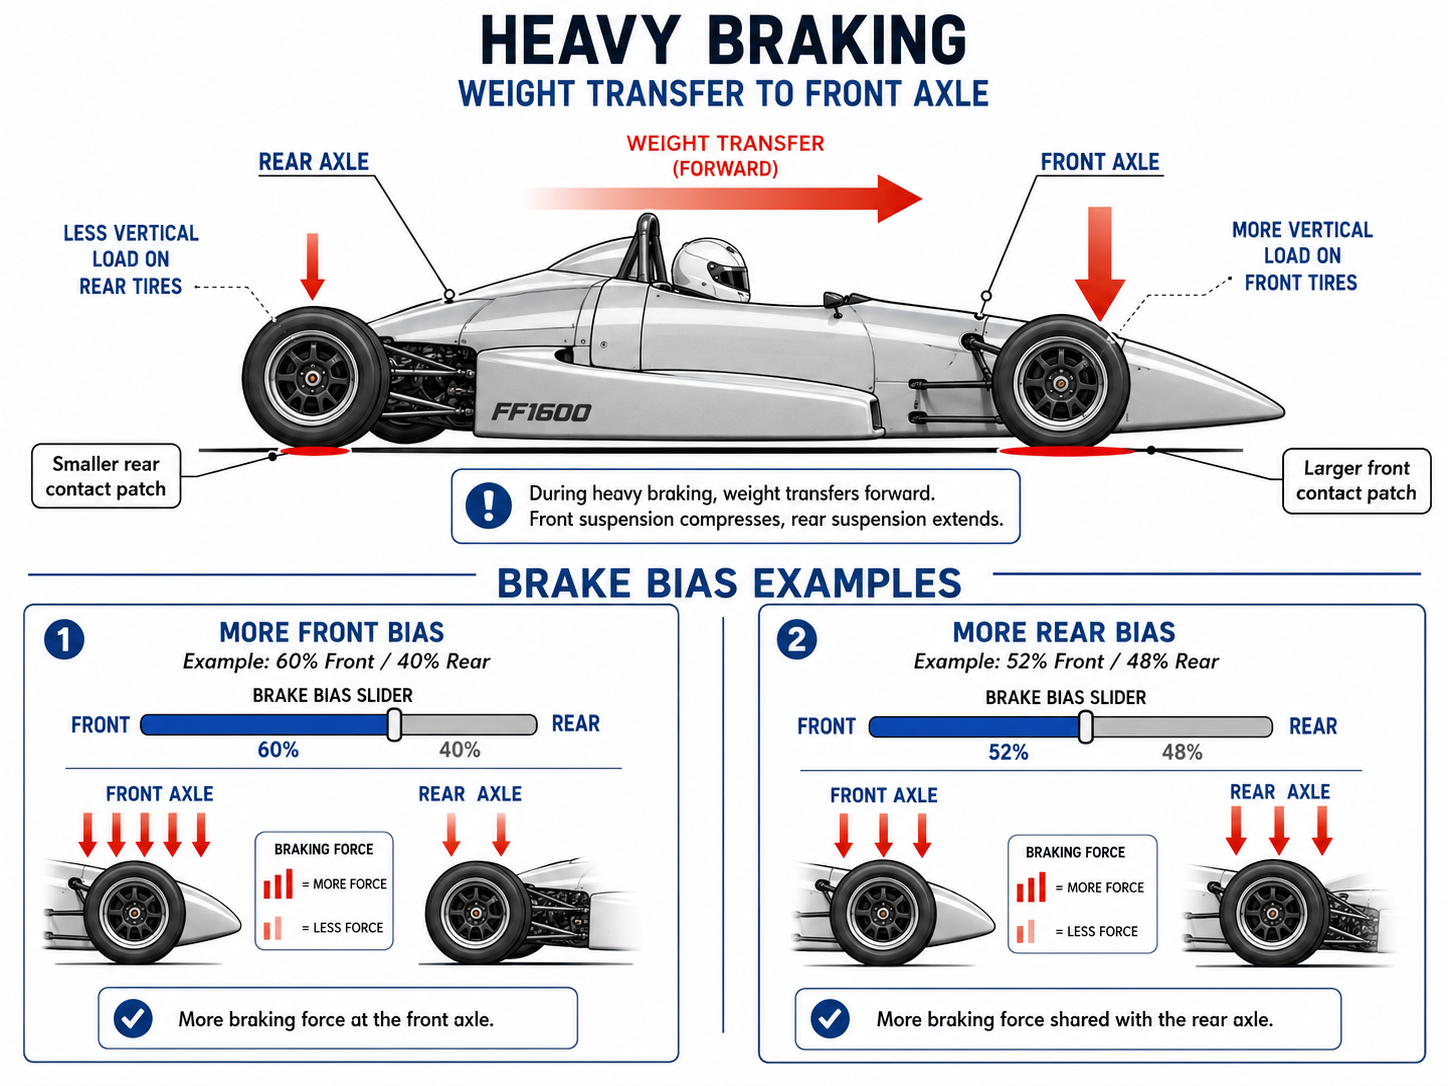
Brake bias is the split between front and rear braking force. The car has one pedal. The bias setting decides how much of that pressure goes to each axle.
More front bias means the front wheels do more of the slowing. The rear does less. More rear bias means the rear wheels do more. The front does less.
That is the entire mechanical story. The interesting part is what it does to the car.
When you hit the brakes, weight transfers forward. The front tires get loaded. The rear tires get unloaded. A heavily front-biased setting tells the loaded front tires to do most of the work. They have grip to spare for a while. Once you start turning, they run out fast. The result is a car that stops in a straight line and refuses to rotate.
A rearward bias asks the unloaded rear tires to slow the car. They have less grip than the front, so they sit closer to lockup at any pressure. A locked rear wheel is unstable. The rear loses traction and steps sideways.
What the car feels like
Theory only takes you so far. The pedal teaches you the rest.
Forward-heavy bias. Brake pressure feels secure. The car points where you steer it on entry, but with a delay. The front edges close to lockup before the rear does anything interesting. Try to trail brake and the front gives up. You slide wide. The car feels like it does not want to turn.
Rear-heavy bias. The car turns in fast. Sometimes too fast. Add brake on entry and the rear feels light. A bump, a curb, a small steering input, and the back of the car starts to swing. The car feels lively, eager, and dangerous.
Balanced bias. Both ends slow together. The car turns when you ask it to. The rear stays planted. There is a clear margin before either end locks. Trail braking feels natural. You can carry brake to the apex and the car rotates without drama.
The right setting sits somewhere between “boring and stable” and “lively but scary.” Most drivers find their sweet spot closer to the stable end early on, then drift rearward as their hands and feet get smoother.
Lockups and what they tell you
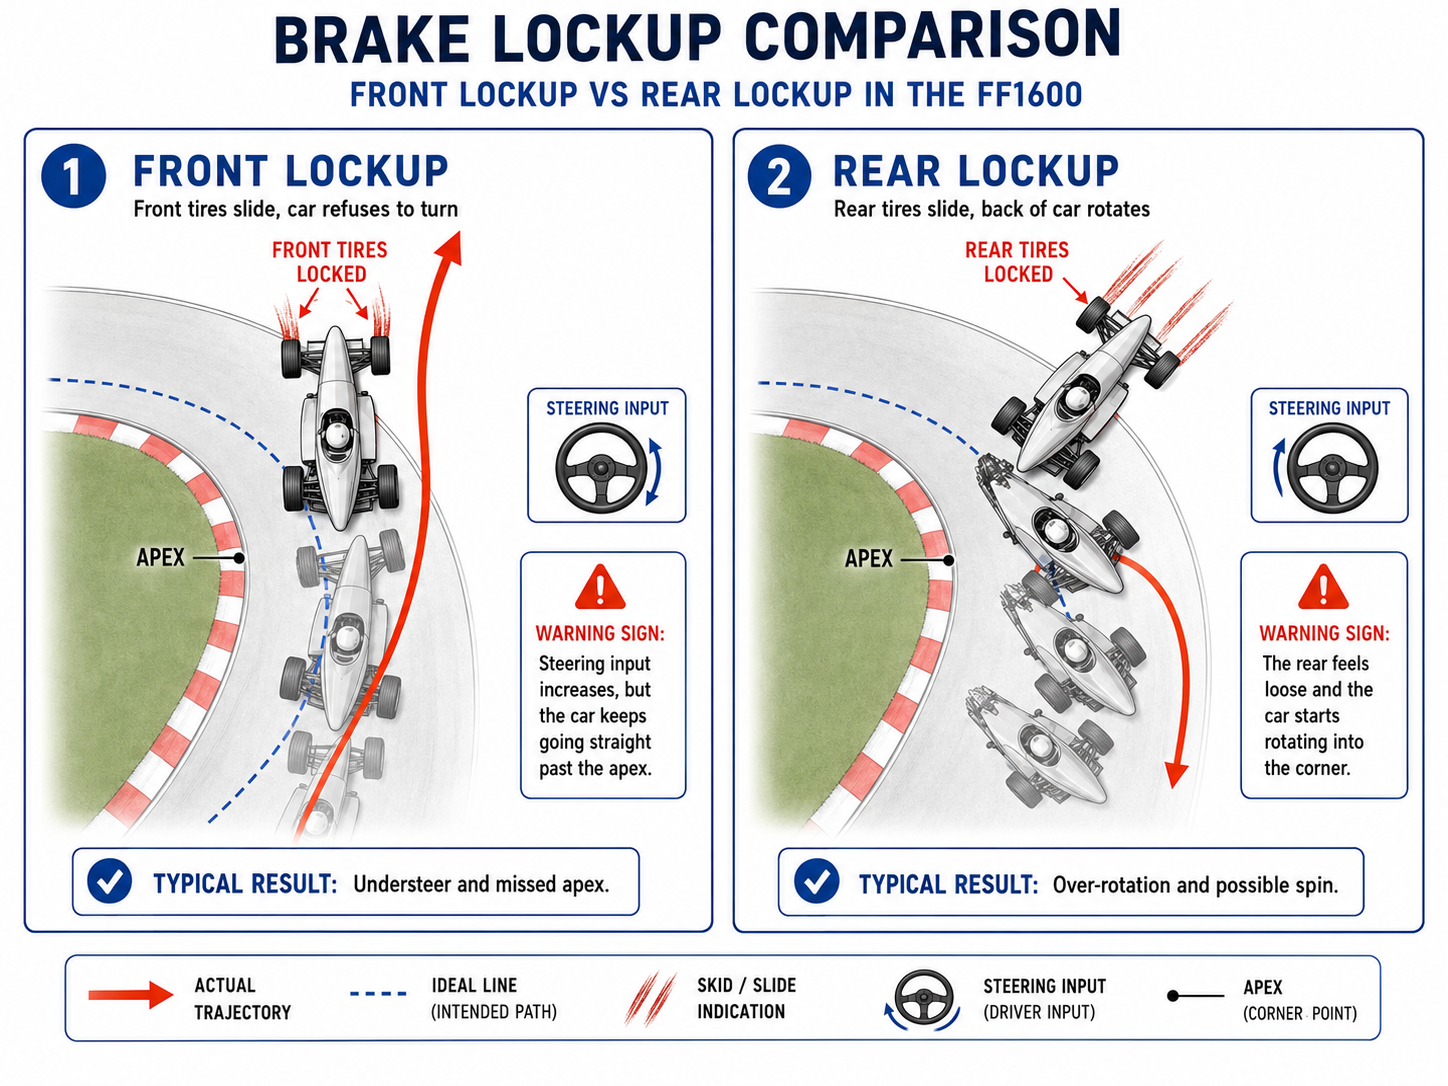
A front lockup is loud and obvious. The fronts skid. The steering goes light. The car keeps going wherever it was pointed and ignores your inputs. Wide entries follow.
A rear lockup is quieter and meaner. The rear loses grip first. The car yaws. You catch it with steering or you do not. If you are already turning, you usually do not.
Locking a front a few times a session is normal while you learn the threshold. Locking the rear is a sign your bias is too far rearward or your release is too sharp. If you are locking the rear regularly, fix the bias before you trust your laps.
The mistakes that cost rookies seconds
Most rookies make the same handful of mistakes. Each one is fixable.
Running max forward bias to feel safe. The car becomes stable but stops turning. Entries get slower. Exits suffer because the car never finishes rotating before you need to roll throttle. Lap time leaks out of every corner.
Stabbing the brake pedal. Sudden peak pressure causes lockups even with a good bias setting. The fronts skip. The car refuses to settle. Squeeze the brake. Do not punch it.
Turning while still at peak pressure. This combination overloads the front and pulls the rear off the ground. The car snaps. Peak in a straight line, then bleed pressure as you start to turn.
Panic lifts mid-corner. A sudden release shifts weight rearward fast. The front goes light, the rear gets loaded, and the chassis transitions in a way you did not plan for. Smooth release. Every time.
Refusing to trail brake. Some rookies treat the brake and the steering as two separate phases. Brake first, then steer. The car never rotates because the front never gets the load it needs to bite mid-corner. Trail braking is not optional in this car.
Adjusting bias five clicks at a time. Big changes throw away your reference. You cannot tell which click helped. Move 0.2 to 0.5% at a time, drive five laps, and write down what changed.
How to adjust bias the smart way
Pick a baseline. A safe place to start is slightly forward of center. Drive five clean laps. Pay attention to two things: does the car rotate on entry, and does the rear ever step out under braking?
Then move the bias and repeat.
Move it rearward when:
- The car refuses to rotate on entry.
- You feel like you are fighting understeer at turn-in.
- The fronts lock before the rear does anything.
- You are braking in a straight line longer than the driver ahead.
Move it forward when:
- The rear steps out under braking.
- The car gets nervous over bumps on entry.
- You are locking the rear before the front.
- Cold tires on the first lap feel unsafe.
After each change, drive five laps minimum. Do not trust one corner. Trust a session.
If you find a setting that works for hot laps but feels scary on cold tires, save two profiles. A safer forward bias for race starts. A livelier setting for the middle stint when the tires are working.
Drills that actually teach you something
Lap after lap of random driving will not fix this. Structured practice will. Pick one drill per session.
Drill 1: Threshold braking
Objective. Find the maximum brake pressure before the fronts lock, in a straight line.
Process. Pick a heavy braking zone. Brake later each lap by half a car length until you start locking the fronts. Stay in a straight line the whole time. Do not turn. Do not trail. Just brake.
What to feel. The fronts produce a faint chatter just before they lock. The steering loads up, then goes light when grip is lost. That edge is your threshold.
Common mistakes. Stabbing the brake instead of squeezing. Watching the brake marker instead of the corner. Turning before the car is fully slowed.
What the results mean. If you cannot find the threshold, your pedal calibration is probably too soft or your bias is so forward that the rear is doing nothing. If you find lockup at low pressures, you are either too far forward on bias or your pedal is too sensitive.
Drill 2: Trail braking
Objective. Carry a light brake trace from turn-in to apex without losing the rear.
Process. Brake earlier than usual into a medium-speed corner. Bleed pressure as you add steering. Hold a light trace, around 10 to 20%, all the way to the apex. Release fully at the apex. Roll throttle out.
What to feel. The front bites. The car rotates. The rear stays settled. If the rear gets light or starts to step, slow your release or move bias forward 0.2%.
Common mistakes. Holding too much pressure into the corner. Releasing in a sudden lift instead of a slow taper. Adding steering before easing off the brake.
What the results mean. A car that rotates beautifully on a light trail brake is set up correctly. A car that pushes wide on entry needs less front bias or a longer trail. A car that snaps the rear needs more front bias or a smoother release.
Drill 3: Lockup detection
Objective. Learn to feel a lockup the instant it starts.
Process. Brake hard enough to lock at least one tire on purpose. Do this in a straight line on a quiet section of track. Lock the fronts. Then try to lock the rears by adding rear bias temporarily.
What to feel. A front lockup goes silent on the steering. A rear lockup yaws the car. Both have a distinct moment where grip vanishes.
Common mistakes. Not committing to the lockup. Locking and immediately lifting, which masks the feeling. Practicing this in a busy session and causing wrecks.
What the results mean. Now you know what your specific car feels like at the edge. You will recognize the signs in race conditions and back off the brake before a small problem becomes a spin.
Drill 4: Consistency testing
Objective. Repeat the same braking input lap after lap.
Process. Pick one corner. Drive ten laps with the same brake marker, the same peak pressure, the same release rate. Use replay or telemetry if you have it. Compare your traces.
What to feel. A repeatable rhythm. Brake. Squeeze. Bleed. Release. The corner becomes muscle memory.
Common mistakes. Chasing lap time instead of consistency. Changing inputs because the last lap felt slow. Driving while distracted.
What the results mean. If you can repeat the input but the car responds differently each lap, your setup is unstable or your tires are changing. If the input itself varies, that is the problem to fix first.
Drill 5: A/B comparison
Objective. Test two bias settings back to back and feel the difference.
Process. Run five laps at your current bias. Adjust the bias 1.0% in one direction. Run five more laps. Adjust back. Run five more.
What to feel. A real, recognizable change in entry behavior. If you cannot tell the difference, the change was not big enough. If both feel terrible, your baseline was wrong.
Common mistakes. Changing two things at once. Forgetting the baseline. Drawing conclusions from one fast lap or one bad lap.
What the results mean. You now have a felt sense of what 1% of bias does. That intuition is more useful than any numerical recommendation.
Drill 6: One click at a time
Objective. Hone in on your optimal setting.
Process. Start at your A/B winner. Move bias 0.2 to 0.3% in the better direction. Run five laps. If it is still better, move again. Continue until the next click makes the car worse.
What to feel. Each step should produce a small, noticeable change. The last step should feel slightly worse than the one before it. Back up one click.
Common mistakes. Impatience. Skipping clicks. Stopping when the car feels good instead of pushing to find where it stops being good.
What the results mean. You have found your current optimal. Note it. Try it on other tracks. The setting will drift as your driving smooths out, so revisit this drill every month.

How your preferences will change
The bias setting that feels safe today will feel slow in three months.
Beginners need stability. The car has to be predictable while the hands and feet are still learning to be smooth. A forward-biased car gives that. The penalty is a slower entry and a car that resists rotation, but the trade is worth it while you build basic consistency.
As your inputs get cleaner, the stable car starts to feel dull. You will brake earlier than you need to. You will feel the car wanting to turn before you give it permission. That is the signal to move bias rearward. The car wakes up. Entries get faster. Trail braking becomes natural.
Top drivers run cars that would feel terrifying to a rookie. The rear is light. The front bites hard. The margin to a mistake is small. They get away with it because their inputs are surgical. They release the brake the same way every lap. They never stab. They never panic. The unstable car rewards their precision with rotation and lap time.
This is why copying alien setups is a trap. The setup that makes an alien fast will make you crash. They drive around problems that would spin your car twice a lap. Take their bias setting as a destination, not a starting point.
Build up. One click at a time. Earn the unstable car.
Where to go from here
Pick a track you know. Set the bias to a slightly forward baseline. Run the threshold drill, then the trail brake drill, then the A/B drill, across three sessions. Write down what you feel. Write down the numbers.
Then trust your hands more than the internet. The forum will tell you what setting some guy with a wheel and a YouTube channel runs at Lime Rock. Your hands will tell you what your car does when you ease off the pedal at the apex of Big Bend. One of those signals is worth listening to.
The reason fast drivers are fast is not that they found the right setup. It is that they spent the time to find their own.
Top 5 brake bias rules for FF1600 drivers
- Start forward, move rearward. A stable car teaches good habits. An unstable car teaches bad ones.
- Move in small steps. 0.2 to 0.5% at a time. Anything bigger and you lose your reference.
- Drive at least five laps before judging a change. One lap is noise. Five laps is signal.
- Match bias to conditions. Cold tires, race starts, and bumpy tracks want more forward bias. Hot laps and smooth surfaces want more rearward.
- Never copy an alien’s setting. Their bias was earned. Earn yours.
Quick symptoms reference
| Symptom | Likely cause | Direction to move bias |
|---|---|---|
| Fronts lock under hard braking | Bias too forward, or peak pressure too high | Reduce peak pressure first. If lockup remains, move slightly rearward |
| Rear steps out under braking | Bias too rearward, or release too sharp | Forward |
| Car refuses to rotate on entry | Bias too forward | Rearward |
| Pushes wide at apex | Front overloaded by trail braking | Forward, or shorten the trail |
| Rear nervous over bumps on entry | Bias too rearward for rough surface | Forward |
| Locking rear on cold tires | Bias too rearward for tire temp | Forward, especially for race starts |
| Front chatter at threshold | Approaching front lockup | Hold bias, soften pedal rate |
| Car feels dull and slow on entry | Bias too forward for your current skill level | Rearward, one click at a time |